
As you can tell by the post date, we're a little late. We ran into a few snags, such as the only true fabric store in town not having any more canvas and being delayed a few days in getting to Hobby Lobby. I also had to find some inspiration. Creativity is not a strength, but duplication is!
This inspiring photo coupled with the memories of my childhood calendar led me to create the following.
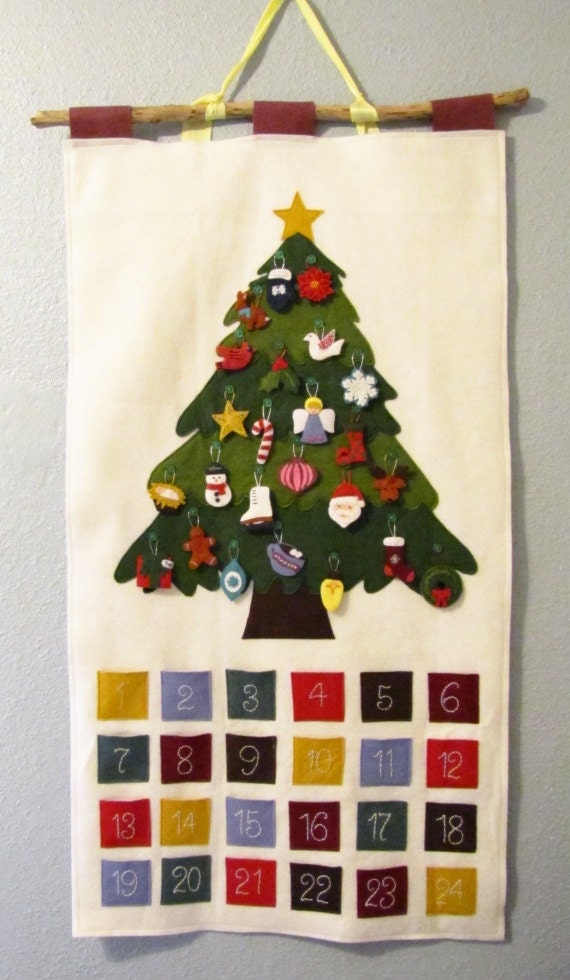  |
| Inspiration! My Advent so far... |
Supplies:
- 17"x 14" Pocket Fabric, ironed.
- 20"x 29" Calendar Fabric, ironed. (White canvas is always a nice choice for the front.) ***UPDATE: 36"L would be better!
- 20"x 29" Backing Fabric, ironed. (Go classic or wild, this side is just for you! It will, however, serve a major purpose of hiding all of your stitching in the end.) ***UPDATE: 36"L would be better!
- Four or five 6"x12" Fleece in contrasting colors (branches).
- 3"x3" Fleece in brown (stump).
- Cut calendar fabric 21"x 36".
- Cut 4 strips of the pocket fabric 18"x 3.5".
- Iron both 17" sides to create a 0.5" hem. If you're keeping track, the depth of your pocket was just reduced to it's final size of 2.5".
- Iron both 3.5" sides to create a 0.5" hem. The length of your strip is now 16".
- Straight stich one of the 16" sides of each strip. This is the top of the pocket, so we can give it a finished edge this early in the game.
- Take one of your pocket strips and lay it right side up, centered, and parallel to the bottom of your calendar roughly 2.5" away from the bottom and sides. (The finished calendar edge will eventually be 2" away from the bottom and sides of your pocket fabric after stitching a 0.5" seam with your backing fabric, but let's not get ahead of ourselves!)
- Below are some pictures of the next few steps!
- The pocket fabric will NOT lay flat! Don't worry --- it looks wonky for a reason. You haven't made a mistake! We are forcing the 16" strip to fit into a 15" section. The purpose of this is to create some actual space within the pocket so that little fingers can grab those adorable felt ornaments!
- The plan is to pin the bottom of the strip (only ironed, no stitching) to the canvas to attach the base of the pocket. To pin this wonky section, we will DIVIDE & CONQUER! I've talked about this strategy before, but if it's new to you, here's a quick review: (see image #1 above)
- Pin on the outsides of the fabric first (i.e., put a pin at 0" and 15" just within that ironed seam).
- Pin the middle of the fabric (i.e., at 7.5"). You will need to evenly divide that extra fabric onto either side of the 7.5" pin. Your fabric should now resemble a deflated M.
- Pin the middle of each side of the M (i.e., at 4" and 12"). Again, evenly distribute that fabric onto either side of the pin. Your fabric should now have 4 humps.
- Pin the middle of each of those sections (i.e., at 2", 6", 10", and 14"). Do you see how you've been able to divide up that extra fabric? Fabulous trick isn't it. You can continue to divide & conquer pin if you like just to make sure you don't get any big folds as you sew the bottom of the pocket. You'll probably end up with a few tiny ones, but nothing to get upset about.
- Take your next pocket strip and place it 1/4" below the top of the previous strip you pinned. Essentially, you are tucking this strip just a hair beneath where the top of the bottom pocket will lay. This will disguise your stitching. You can space it out further if you prefer, just remember to reduce the size of your tree OR add more length to your calendar fabric.
- Repeat step 9 with the remaining 2 strips so that all 4 strips are nicely pinned to your calendar fabric.
- Straight stitch the bottom of this pocket onto your canvas following the seam line. I wouldn't try to do 1/4" or anything fancy, simply follow the line. This bottom stitch will be the only visible stitch line for the bottom of the pockets --- the others will overlap. Don't stitch the sides of the pocket --- those will come later. Pace yourself! (see image #2 above)
- Make sure that bottom pocket is folded back toward the bottom of your calendar fabric so it doesn't get in the way as you sew the other 3 strips. (see image #2 above)
- Now to create 6 pockets out of each strip and take a bathroom break!!!
- Using a yardstick or other large ruler, we will pin vertical lines to divide & conquer. I lined up a piece of cardstock next to my ruler and pinned the cardstock to my fabric to use as a guide to sew the straight line. Looked really tacky, but it made a PERFECT line!
- Pin at 0" & 15". (You will sew just inside the folded hem at 1/8" and at 14 and 7/8".)
- Pin at 7.5".
- Pin at 2.2", 5", 10", and also at 12.5".
- Stitch vertically across all 4 strips starting in with the middle line at 7.5".


I had mixed success trying to make this a measurement game and ended up cutting the tree pieces multiple times. My best suggestion is to use the space you have available and divide it up as you see best. I placed my stump at 1.5" above the top red pocket. Based on the length of the fabric left (approximately 15.5" minus the top 2.5" for the hem and border = 13"), I drew a tree with 4 layers on cardstock and then used those as templates for my fleece tree. I didn't like how skinny my tree looked, so I made some wider ones. Once I was happy with the shape, I stitched around each piece of fleece starting with the stump (brown thread), then the bottom branch (hunter green thread), then the next (lime green thread), and so on.
No comments:
Post a Comment
Note: Only a member of this blog may post a comment.